Sunday, April 15, 2018

Hello Spring

Hi!

It's Anja here. I have two cards for you today, made with new Cottage Cutz dies. You have to check out the new Llamas & Botanical release that is already available in the store. The llamas are so cute. But first I tried out the lovely spring flowers.


For two cards I used:
- Cottage Cutz dies (Botanical Garden 1, Botanical Garden 2, Sugar & Cream Alphabet),
- Zig Rel Brush Markers (Numbers: 021, 023, 025, 026, 027, 041, 043, 044, 045, 046, 050, 051, 052, 070, 080, 084),
- Gansai Tambi watercolors,
- Distress Oxide (Peeled Paint),
- white card base (2 15x11 cm),
- watercolor paper for background (2 14,6x10,6 cm) and die cuts,
- adhesive foam pads,
- foil,
- heat gun,
- watercolor brush,
- paper glue.

First I cut two rectangles from watercolor paper and spritzed with green color first.


I used foil and put it over the drops and to get different marks.


Then I spritzed other three colors and did the same with the foil.


I cut flowers and other greenery with Botanical Garden dies. I used watercolor paper for the die cuts. I glued the cuts on the background paper.


Then I started coloring. I used Zig markers and watercolor brush. I colored first and then glued some cuts on the colored flowers.


When I had everything colored I used Distress Oxide Peeled Paint to shadow the edges of the paper and also the spaces between the flowers.


Then I cut Hello and Spring words and colored it with Zig markers.


I glued the words on smaller pieces of paper. I did the same with the edges.


In the end I glued the everything on the card base using adhesive foam pads.


And this are my colorful spring cards.


I hope you'll give llamas and other botanical dies a try. You can get them for 25 % discounted price. I can't wait to use the other new dies.


Have a wonderful Sunday and see you again next week.
Anja Z.


Cottage Cutz products I used:


Saturday, April 14, 2018

Teacup Garden (new die)

Hello Scrapping Cottage friends! Thanks for taking the time to stop and visit with us today. It's Mary Marsh here bringing you the Saturday edition of the Blog. We have a new release of dies and they are 25% off for a limited time. The new dies are the Llamas & Botanical. There are 13 new designs in this release.

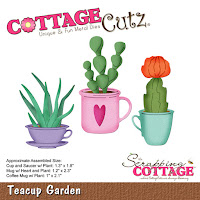
Today for your viewing pleasure, I am featuring the new Teacup Garden die. I thought it would be a good one to use for a Mother's Day card. So let's get started with the details on how I created this card.

Step 1: This week I started my card with a sketch I found online. I thought it would work perfectly to showcase the Teacup Garden image as well as add layers to my card. Since I like to use patterned paper, the addition of layers to my cards always works for me. This one already had the layer panels and shapes sized out. I usually just estimate sizes but this worked for me this week.
Step 2: I looked through my pattern paper and found this design that had cups on it. Even a cup with a heart - how perfect!. I just had to decide on my other card colors. For my card base, I used melon mambo cardstock that matched the patterned paper.

The center square layer is patterned paper from the same collection. I used the 2nd largest  stitched  rounded square  die to cut it and then a corner rounder.
On the long gray panel I used an embossing folder that somewhat matched the patterned paper underneath it.

Card Measurements:
Melon Mambo Card Base:  4 1/4" x 5 1/2"
Patterned Paper Background Layer: 4 1/8" x 5 3/8"
Gray Circle: 4th largest Stitched Circle die
White Circle: 4th largest Circle die
Step 3: Once the card colors and papers were selected, I was ready to cut the teacup and succulent image. For the cup I used melon mambo cardstock, a garden green for the succulent and a pink for my heart, This die even includes a piece to simulate dirt. For that,  I used chocolate chip cardstock.
Step 4: I started some of the card assembly. Attached all of the panels except the image panel. I wanted to stamp my sentiment first so I would have the placement I wanted before I attached the image.
Since I was using a photopolymer stamp set, I pulled out my MISTI just in case I didn't get a good image the first time around. I thought the first stamping was a bit light so I inked and stamped a 2nd time. 
I attached the cup to the white circle with dimensional adhesive and then attached it to the gray circle.
 
 Step 5: Instead of another circle that is in the sketch, I decided to use a Stitched Heart and stamp the "Mother Phrase' on it. With a sketch you don't always have to use the shape called for. As long as your finished product looks like the sketch layout, you're good.
 
The stamp I am using is a cling stamp so I used my stamp-a-ma-jig for placement. With this tool you are stamping on plastic, and in the photo it looks like its not a good image. But, you are only using the plastic for a straight alignment. Once it's stamped, it's fine and usually with the cling stamps I get a good impression the first time. I haven't figured out how to use the MISTI with these stamps.
 
 
To complete my card, I attached the heart. I thought about adding some sequins or enamel dots. But with the background paper pattern being a bit busy I thought they would be lost. So it's complete as is and now I have another card for Mother's Day. 
I hope I have given you another idea on a way to use these new dies. For additional samples, look back on the blog. the DT has been showing them all week. I will see you next Saturday.
 
dies I used to create card:
http://www.scrappingcottage.com/cottagecutzteacupgarden.aspx
http://www.scrappingcottage.com/cottagecutzcirclesetbasics.aspx

http://www.scrappingcottage.com/cottagecutzstitchedcirclesetbasics.aspx

http://www.scrappingcottage.com/cottagecutzstitchedheartsetbasics.aspx
http://www.scrappingcottage.com/cottagecutzstitchedroundedsquaresetbasics.aspx


Friday, April 13, 2018

Blossom and Live!

Hello Scrapping Cottage friends! It's Jeanne posting today and I'd like to thank you for taking the time to stop and visit. We have a brand new release of Llamas & Botanicals dies available in the online store. And the dies are currently on sale for a limited time at 25% off the retail price.

Today's card features flowers from the  Botanical Garden 1 and Garden Bird dies.  I love the flowers in the Botanical Garden sets (there are two!) because they are ultra versatile.  You can put these together many ways to come up with some really gorgeous flowers.
This card is for the color challenge and the sketch challenge at Splitcoast Stampers this week.  The colors are Crumb Cake, Powder Pink, Wild Wasabi and Chocolate Chip.
You see I varied a little from the sketch by substituting flowers for stars and I used the Double Stitched Rectangle as my bordered frame in the center.
I cut flowers from both the Garden Botanical 1 and Garden Bird in both the pink and green.  I also cut one each of the middle and next size down Double Stitched Rectangle in Crumb Cake and three of the smaller ones in Chocolate Chip.
I sponged the edges of my flowers in Powder Pink and used a cotton swab to add Wild Wasabi ink to the center of the flowers.
You will notice that some of the features I originally cut don't show in my finished card.  That is because I sometimes design as I go and this is one of those cards.  It developed a life of it's own as I went along!  I started with the word Love from the Live, Laugh, Love sentiment on the small rectangle.  It seemed overwhelming to me so I decided to just use the larger rectangle instead and I decided that I liked the word Live better for this card.
So I angled the word Live across the larger rectangle and cut out three more from the Chocolate Chip card stock so I could stack them. Before gluing the rectangle stack to the Crumb Cake card base, I added the branch from the Garden Bird die under the stack.  It is very subtle and adds an embossed look to the card.  The flowers are from Garden Bird but the leaves and flower stamen are from Botanical Garden 1.  I am loving how you can combine these sets!!
For the flower on the upper corner I added some Powder Pink ink to the petals and also to the stamen.
I am quite pleased with this card and how it fits the challenges.  I hope you give the Botanical Garden 1 and Botanical Garden 2 dies (and others in this release too) a try!

I had so much fun playing with all the flower combinations.  When I first started this card I cut all the flowers in white just to play with combinations of petals and greenery.  I was restricted here by the colors in the color challenge - I can imagine how much fun it will be to play not only with the flowers but various color combos as well!  Looking forward to the weekend!

http://www.scrappingcottage.com/cottagecutzbotanicalgarden1.aspx

http://www.scrappingcottage.com/cottagecutzgardenbird.aspx
http://www.scrappingcottage.com/cottagecutzdouble-stitchedrectanglesetbasics.aspx

 
http://www.scrappingcottage.com/cottagecutzlivelaughlove.aspx

Don't forget to stop by the online store and check out the new dies that are on sale for a limited time.

I hope you have a creative weekend!


Thursday, April 12, 2018

Mother's Day is Coming!

Good Morning Scrapping Cottage Friends!

It is Pam creating with you today!

Thanks for taking time to stop by today!  We have a brand new release of Llama & Botanical dies available in the online store.  And the dies are currently on sale for a limited time at 25% off the retail price.

The new dies have a couple of super cute Llama images as well as cactus and other succulents.  And don't miss the sweet hummingbird and garden bird too!  This new release is so versatile!  They can be used for all kinds of cards and other projects!

I am using the new Dogwood Branch!
Design Steps:
 1.  Using the Dogwood Branch die cut out all of the pieces in white
 2.  Using the Double Stitched Square die cut out the third largest in white.  Then keep the die intact with the paper.  Place a cloud stencil over the top and sponge on the blue ink
 3.  Pull the square away from the die and it will give you a nice clean edge
 4.  Use your Copic Markers to color the branch and leaves
 5.  Use your Copics to color all of the flower pieces also
 6.  I used a shaping tool to give the flowers a little bend
 7.  Glue the flower layers together
 8.  Glue the branch to the cloud covered square as shown
 9.  Arrange the flowers as shown
 10.  Use an A2 white card base a slightly smaller piece of DP and then a piece of blue cardstock cut to 3 3/4 x 5.  Run it through an embossing folder for some texture
11.  Use craft foam on the back of the cloudy square then glue to the card front.  Stamp your sentiment and layer onto DP glue to the front of the card.  Add the bow and your card is complete!
Cottage Cutz Products used:


As always thanks so much for stopping by and don't forget to take a look at the new release dies. They are just so sweet!  And they are dies that can be used over and over again for so many different projects and occasions!
Blessings
Pam