Showing posts with label peachy keen stamps. Show all posts

Sunday, November 20, 2016

Season's Greetings


Hello everyone,

Can you believe it is almost the end of November!  Is everyone ready for Thanksgiving?  Do you have any special plans?  My plans are to spend the holiday with my family and eat plenty of good food!  I wish all of you a Happy Thanksgiving and enjoy your family and friends!

It's Donna here and I am back again featuring some of the new release stamps by Peachy Keen Stamps.  The Peachy Keen Stamps work perfectly with the CottageCutz Christmas ornament dies. CottageCutz has several different shape ornament dies in the store, be sure to go over and check them out!  Did you know Peachy Keen stamps all have a tint of pink symbolizing the "Peach"?  They have been around since 2003 featuring their whimpsical face stamps.  They are just the cutest ever and I have really enjoyed working with them.  

 I am using the Candy Cane 1 7/8th Face Set and the Candy Cane 1 1/8th Face Set.  Here is my card:


Closer look at the card.

Here is how I put my card together:
  • The card is an A2 card 4 1/4 x 5 1/2,
  • The red and white stripe design paper is the same size as the base of the card, 
  • The red solid piece is cut from the CottageCutz Double Stitched Rectangle Set,
  • I cut all the elements that I wanted to put on my card:

  • I cut the small and medium nested ornaments bulb,
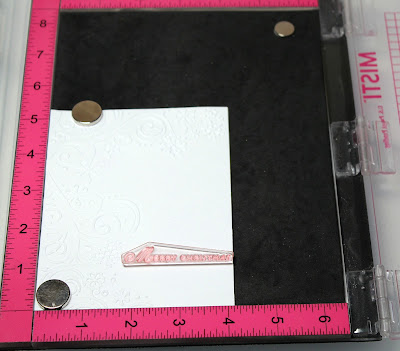
  • I then used my Misti to stamp on the faces on the bulb ornaments,
  • I added all the elements to my card,
  • I finished it off by adding the red bling to give the bulbs some dimentsion.
Thank you so much for stopping by, please come back again soon!

Dies and stamps used:


Sunday, November 13, 2016

Merry Christmas

Hello everyone!

It's Donna here again with CottageCutz  and Peachy Keen Stamps to celebrate their new release of face stamps that work well with the CottageCutz Christmas ornament dies. TWO NEW SIZES of Face Stamps have been added to their release, 1 5/8" and 1 7/8" to fit the super fun ornaments by CottageCutz. Please stop over at Peachy Keen Stamps because Kathy is offering some promotional pricing on her new stamps sets that will go perfectly with the CottageCutz dies.

Here is my card using the Peachy Keen stamp sets Ornament 1 1/8" Face Set.  I am using the Cottagecutz Nested Ornaments: Star.  I am using the smallest star of the set.


Here is how I put my card together:
  1. The card is an A2 card 4 1/4 x 5 1/2,
  2. The black layer is 4 x 5,
  3. The next layer is 3 7/8 x 4 7/8, I embossed the branches and added some wink of stella to give it some dimension,
  4. The star ornament is die cut from the smallest die in the Nested Ornaments: Star set, 
  5. I colored the  face with copics. I used YG13 for the eyes, YR68 for the nose, and R29 for the mouth.  The cheeks I used R00,  
  6.  finished my card off by adding the sentiment by CottageCutz "Merry Christmas".

Closer look at the star ornament, I added some clear wink o stella around the edges.

 Closer look at the Merry Christmas sentiment.

Dies used:


Sunday, October 30, 2016

Season's Greetings!

Hello everyone!

It's Donna here and CottageCutz has partnered with Peachy Keen Stamps to celebrate their new release of face stamps that work perfectly with the CottageCutz Christmas ornament dies. TWO NEW SIZES of Face Stamps have been added to their release, 1 5/8" and 1 7/8" to fit the super fun ornaments by CottageCutz.  Please stop over at Peachy Keen Stamps because Kathy is offering some promotional pricing on her new stamps sets that will go perfectly with the CottageCutz dies.

Ornament 1 1/8th" (smaller circle).  I am using the Cottagecutz Nested Ornaments:  Ball.


Here is how I put my card together:
  1.  The card is an A2 card 4 1/4 x 5 1/2,
  2. The red design paper is the same size as the base of the card, 
  3. The blue frame is die cut from the largest Cottagecutz "Stitched Wide Rectangle Frame Set",
  4. I die cut two of the Cottagecutz Nested Ornaments:  Ball (I used the medium and small sizes,


     5.  I used my Misti to line up the stamp on the circle,


     6.  Here is how it looks after I have stamped the face,


7.  I colored the snowmen faces with copics.  I used Y17, Y38 and YG68 on the snowmen's noses, B0000 on the eyes and R00 on the checks.  I used my white gel pen on the circle part of the eyes to make them stand out,
8.  I finished my card off by adding the sentiment by CottageCutz "Season's Greetings".

If you have not joined the challenge for this month, you have until Monday.   The theme is fall. Here is the link for more info.

Dies used:


Peachy Keen Stamps used:


Friday, October 28, 2016

~From Our House to Yours~

Hello Scrapping Cottage friends! Thanks for taking the time to stop and visit today. It's Mary Marsh here bringing you the Friday edition of the Blog. Can you believe that October is almost a wrap?
The countdown to Christmas is starting. Yikes! I am behind on both Christmas and Thanksgiving cards. Hopefully, I can correct that some this weekend.
 
Today I am showing you a whimsical style card that would be very easy to mass produce. It's featuring the Nested Ornaments: Bulb and some Peachy Keen Face Stamps. 
 
Our design team partnered with Peachy Keen Stamps to celebrate their new release of face stamps that work perfectly with the CottageCutz Christmas ornament dies. Just a little way to bring some whimsy to your holiday crafting. Check out the site because Kathy is offering some promotional pricing on her new stamps + the CottageCutz dies.
 
Let's get started with my card and some details on what I did.
 
Red Card Base: 4 1/4" x 5 1/2"
White Embossed Layer: 4 1/8" x 5 3/8"
 
I decided to use this Cuttlebug winter themed embossing folder as the backdrop for my ornaments. Wanted to create some background interest.
 
My next step was to die cut my ornaments in red cardstock. I used the smallest ornament in the set.  The face stamps come in different sizes and for this ornament I used the 1 1/8" set. I made a guy and a girl ornament to coincide with the sentiment I used.

Before I assembled my card I stamped my sentiment. The "from our home to yours" is a one line stamp. I used my MISTI Tool to get the placement I wanted on 2 lines.
Using the MISTI I placed my Merry Christmas stamp on my background panel.
 
 
I lined up the "from our home to yours" stamp and masked off the part of the stamp I didn't want on the 2nd line of my greeting. 
 
2nd line of sentiment stamped
Repeated the same masking process and stamped my 3rd line of sentiment.
Now I am ready for the card assembly. I used some 1/8" striped red ribbon to "hang" my ornaments. Scattered some red sequins and my card is completed. I hope I gave you some additional inspiration for Christmas.
 
Also don't forget about our newest challenge going on right now. The theme is fall. Here is the link for more info.
Until next week..........inky hugs.
 
http://www.scrappingcottage.com/cottagecutznestedornamentsbulbbasics.aspx


Saturday, December 03, 2011

PSA Essentials/Cottage Cutz Blog Hop - Day 2


Hi Everyone!
Just popping in for a quick second to let you know today is DAY 2 of the Scrapping Cottage's co-hop with PSA Essentials!

Here's a look at the card I made for the hop: 


I was lucky enough to be in a hop with PSA earlier this year and used one of the sweet Whimsy Cakes to make this gingerbread couple look like they'd baked a holiday treat just for you!

I used the Gingerbread Doll Die from the Peachy Keen line as well as the Doll Accessories 1 package.

Just in case you didn't get a chance to visit all the stops yesterday, here's a list of all the designers!
Have fun!

Angelica

·         www.kcreatedbykay.blogspot.com - Kay Norman
·         http://www.thecountrychiccottage.net -  Angie Holden
·         www.thethinkinspot.blogspot.com - Lorie Souther
·         http://paperiepetals.blogspot.com - Kim Schofield
·         www.maisymary.blogspot.com  - Pearl Liu
·         www.lingshappyplace.blogspot.com - Vera Yates
·         www.stampingwithjanice.blogspot.com  - Janice Wilson
·         www.simpleflourishes.com - Jennifer Holmes
·         www.pinkcloudscrappers.blogspot.com -  Lori Leng
·         http://inkypaws.blogs.splitcoaststampers.com/ -  Jeanne Streiff
·         www.ginicagle.blogspot.com  - Gini Cagle
·         www.livingthecircuslife.blogspot.com - Kim Moreno
·         www.taylordconcepts.blogspot.com  - Erika Taylor
·         www.fantastink.blogspot.com - Meylssa Connolley
·         www.handmadebyangelica.com  - Angelica Suarez
·         www.sweeetdesignsbycheryl.blogspot.com  - Cheryl Walker  
·         http://maearmstrong.blogspot.com - Mae Armstrong
·         http://scrappingcottage.blogspot.com/ - The Scrapping Cottage
·         www.psastampcamp.blogspot.com – PSA Essentials


Tuesday, September 13, 2011

You're a Peach!

Hi Everyone! Happy Tuesday! Angelica here, and today I'm sharing a pretty CAS (clean and simple) card showing you just how much of a punch this cute Peach die packs!

{click to enlarge} 

This die comes with two clear face stamps by Peachy Keen Stamps already, but did you know you can use any 1-1/8" - 1-3/8" PK face on the peach too? I used the Princess Faces (1-3/8" face in the assortment) for my card today!

After I shaded the peach in a peachy-pink ink (Colorbox), I used chalk to shade her cheeks and used a white gel pen for the whites in her eyes.

The "peach" stickers are from My Little Shoebox and I used "Peapod" twine from The Twinery.


Hope you enjoyed the project today, be sure to stop by Barry's Challenge from Saturday and play along for a chance to win!!

Monday, October 18, 2010

Happy Monday Morning Friends!


Good morning everyone! I am so excited about the new dies at The Scrapping Cottage! I can't wait to try them all. Today I have a card featuring Lisa Jean Witch. This die set comes with 3 Peachy Keen Stamps, a toothless grin face, a cranky witch face, and an angry broom face. I chose to use the crabby witch face today as I used the other face just a short time ago on my blog.

I cut the pieces using white cardstock and colored them up with my copics. I am so happy Lorie taught us that wonderful trick. I find myself cutting most of my images in white. I love to color and I feel that you can get a much more detailed image doing it this way. Please be sure and check out the new dies at The Scrapping Cottage or at Peachy Keen Stamps. They have been selling quickly. They are definitely dies you will want for your Halloween collection. I would love to see what you create with your Cottage Cutz dies. Just leave a comment with a link so I can come take a look. Enjoy your day and I will be back next Monday with some more Halloween cuteness.

Sunday, August 15, 2010

Run, run as fast as you can!


Hello fellow crafters! I hope you all had a nice weekend. The weather was gorgeous here in Massachusetts!

I love gingerbread men images, especially the ones made by Peachy Keen! For today's card I used the Cottage Cutz Gingerbread Doll, which comes with 2 Peachy Keen face stamps, and the Doll Accessories 1. I also used the Frosted Cookie die and the word "sweet" from the Sweet Sign die. The hearts on the Ginger-girl are from the frosted cookie die. I just love these little cuties! I hope you do too! Thanks for stopping by!