As you can see, I am still creating Christmas cards. I don't have all that I need for sending this year so I have been busy in my craft room making cards. Christmas is my favorite season and I love making and sending cards.
Today for your viewing pleasure, I created a Christmas shaker card. I used the Merry Christmas w/reindeer and Mistletoe & Bells dies. So let's get started with some details on how I created this card.
Step 1: Shaker cards are not difficult to make. And the following tutorial will show you how simple they really are. I started by cutting my circle in the image panel. Used the 3rd largest of the Circle dies- it's a 2 3/4"" circle. I embossed the panel with a falling snow folder.
Image Panel: 3 7/8" x 5 1/8"

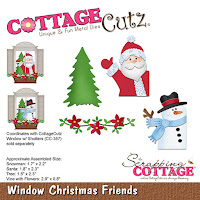
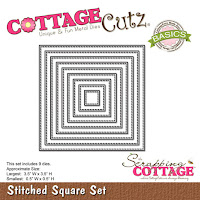
Step 2: Cut the dies I am using for my card. The pine tree inside the shaker is from the Window Christmas Friends die, also used the Merry Christmas w/reindeer and Mistletoe & Bells dies. I used the largest of the Stitched Square dies and cut the panel that would hold the shaker elements in place. I stamped this panel with some snowflakes.

Step 3: Started the assembly of the shaker part of card. Used glue dots to attach the 3 1/2" window sheet to the back side of the image panel. I took a used dryer sheet and rubbed it across the window sheet. It eliminates the static. Used dimensional foam adhesive and attached to edge of circle. I used my powder tool (EK Success) and ran it around the inside of the foam adhesive. It keeps the sequins from sticking to the adhesive.

Added some different colored sequins to the inside of the circle.

I glued the pine trees to the square panel and then centered the panel over the sequins.

I used more dimensional adhesive on the back of this panel to allow it to sit evenly on the card base.

Attached this shaker panel to the red card base.

Step 4: Cut my Merry Christmas sentiment in red cardstock.

Used Ranger multi medium matte and attached to card front.

To complete my card, I added the mistletoe and bells and scattered a few red sequins. I hope I have given you some inspiration on a way to use these new dies. I will be back next Saturday- see you then!!!

Dies I used to create card: