Showing posts with label Merry Christmas Ribbon. Show all posts

Monday, December 26, 2022

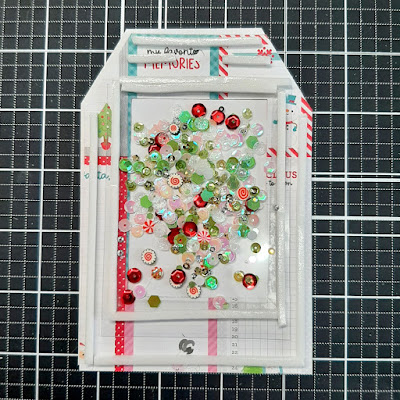
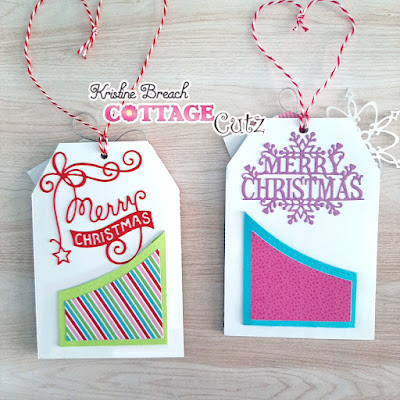
Shaker Tag Gift Card Ornaments

Merry Christmas CottageCutz friends!  I hope you had a wonderful holiday with your loved ones. 

Kris here sharing with you today.  I know most of you are done making Christmas projects now, so maybe you want to save this idea for next year's gifts... OR you can always change the theme and use these for gift bag tags (thinking Valentine's... Birthdays...any special occasion!) ☺  

I'm a huge fan of shakers, so I made 2 ornaments that are shaker tags with gift card holders on the back, using the Jolly Santa Gnome from the Christmas 1 Release & I made the other with the Polar Bear Trio with Igloo from the Christmas 2 Release.  


The patterned papers and tiny tags are from 
Winter Wonderland (Polar Bears Tag) and 
 Let it Snow (Jolly Santa Gnome) from Doodlebug Designs

JOLLY SANTA GNOME TAG
White Cardstock:
• cut 5-1/2" x 3-3/4"
• die cut Jolly Santa Gnome
Red Cardstock (back of tag):
Acetate/Window Sheet:
• 3-1/2" x 4-1/4"
Patterned Paper #1 (red with Santas):
• 5-1/2" x 3-3/4"
Patterned paper #2 (green trees):
• 3-3/4" x 3" - then cut the top with a Hills Slimline die
Patterned Paper (tiny tags):
• cut apart one of the tiny tags and punch hole where indicated

HOW TO:

1.  Glue patterned paper #2 to the bottom of patterned paper #1.

2.  Measure along the TOP of the patterned paper #1 and make pencil marks at 3/4", 1-7/8" and 3"

3.  From the TOP, measure down each SIDE and place a mark at 1-1/4"

4.  Make a diagonal cut from the TOP 3/4" marks down to the 1-1/4" SIDE marks.

5.  Punch a hole about 1/2" down from the center (your 1-7/8" mark)

6.  Place that tag over your white piece and use as a guide to cut the corners off of white tag and punch hole in middle. 


7.  Using a rectangle die, (I used the 3rd largest of the Nested Wacky Stitched Rectangles) center it over your Patterned Paper tag and cut.

8.  Turn that tag onto back side and place Scor Tape (or other strong double sided adhesive) close to the rectangle cut-out.  Attach your window sheet.

9.  Add foam strips/tape just outside the rectangle and around edges of tag.  (See photo below)

10.  Add sequins/shaker elements.


11.  Carefully place your WHITE TAG on top, lining up edges and the hole at top.


12.  Color your Jolly Santa Gnome and attach to tag front using foam tape for dimension. 

*Optional (but highly suggested):  Add Snow Writer (puffy snow, etc) to the trim on his hat & coat!  LOVE the dimension it gives 😊


13.  Glue the red Merry Christmas Ribbon to back of tag.

*Optional:  Add a pocket to the back for a gift card!


POLAR BEAR TRIO WITH IGLOO TAG
Same cutting measurements as the Santa tag with the following exceptions:
• the 2nd patterned paper I glued to the top of the white tag (inside shaker, instead of the front & cut the bottom with the hills die)
• I used the 2nd largest Nested Wacky Stitched Rectangle (larger than the one on Santa shaker)
• I die cut a large snowflake from the Snowflake Set
• I die cut Merry Christmas w/ Snowflakes (for back of tag) from purple cardstock


How CUTE are these?!!  
♥ these adorable CottageCutz dies!

They are for my girls, so here they are on the tree ☺


Merry Christmas to you all, and wishing you all the crafty goodness in 2023!
~Kristine

PRODUCTS USED:


Saturday, November 12, 2016

Northern Lights Background Technique

(click photo to view larger)
Hello Scrapping Cottage friends! Thanks for taking the time to stop and visit today. It's Mary Marsh here bringing you the Saturday edition of the Blog. Another weekend is upon us and that brings us closer to Christmas. Today I noticed out in Blogland that someone mentioned it being 6 weeks to Christmas. Yikes! Time to get busy and get all my cards finished.

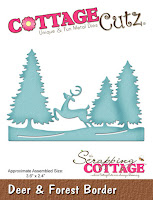
Today, I am using a couple of the dies from the Christmas Part 1 & 2 releases. It's the horse w/ sleigh and the deer and forest border dies. I also tried a technique that I hadn't done before called the Northern Lights technique. I really liked how the background turned out and it's so easy to do. Let's get started with the details of my card.

Purple Card Base: 5 1/2" x 4 1/4"
Cucumber Green Layer: 5 1/4" x 4"
Image Panel: 5 1/8" x 3 7/8"

Step 1: Started by selecting the 5 colors I wanted to use for my background sponging. There is a lot of sponging with this technique and each time you try it the card will turn out just a bit different.
Step 2: I decided to start with the yellow ink first. I made a couple of paths of color using a stamping sponge. The yellow really added some brightness to this background. 
 
Step 3:  I laid down my 2nd ink color using the medium blue ink. Just kind of followed the path of the yellow ink.
Step 4:  Added my 3rd ink color with the rich purple shade. This is really a vibrant ink color and the reason I chose it for my card. With each addition of ink I used a different sponge.
Step 5: On this step I added the medium green ink and again I used a clean stamping sponge. I layered it in all the remaining white areas of my card.
Step 6:  On this final inking step I added the navy blue ink. This is how it turns into a sky. Using my stamping sponge I went in between the 2 colors to break up the line and to kind of mute the colors. You can make your sky as dark as you want it.
 
If it gets too dark you can go back in and add some more of the other colors to brighten it up. I actually turned this base to make my card a landscape design. So I did go back in and add more of the navy after I took this photo. You can see in my finished photo that I did darken it up a bit.
Step 7: I cut my images in black to make them like a silhouette against the northern lights night time sky. The snow bank is a silver cardstock topped with chunky glitter for a glistening snow. My sentiment is stamped in Versamark ink and then I used a black embossing powder to make it bold and stand out.  
 
Step 8:  I am now ready to assemble my card. After it was put together, I decided to add some stars in the same colors I used for my ink. I cut the single stars from the Merry Christmas Ribbon die and scattered them across the sky.
If you want to look at a larger view of any of the pictures, just click on it and it will open up larger.
 
 Well, that's it for me for this week. I hope my card has inspired you to give this technique a try. So until next time........inky hugs!
 
http://www.scrappingcottage.com/cottagecutzhorsewsleighelites.aspx
 
http://www.scrappingcottage.com/cottagecutzdeerandforestborder.aspx
http://www.scrappingcottage.com/cottagecutzmerrychristmasribbonelites.aspx


Friday, October 21, 2016

Whimsical Christmas Star w/Peachy Keen Face Stamps

Hello Scrapping Cottage friends! Thanks for taking the time to stop and visit today. It's Mary Marsh here bringing you the Friday edition of the Blog.

We have been having some great fall weather here in the East. In fact, it was so warm today that when the rain came we actually had a thunderstorm along with it. Who would of thought on October 21?

Normally our autumn days are colder and perfect for staying indoors and creating Christmas cards. But regardless of the weather Christmas is only 2 months away and I still have a lot of cards to make. So for today's card I went a little whimsical with my card design.

Our design team partnered with Peachy Keen Stamps to celebrate their new release of face stamps that work perfectly with the CottageCutz Christmas ornament dies. Just a little way to bring some whimsy to your holiday crafting. Check out the site because Kathy is offering some promotional pricing on her new stamps + the CottageCutz dies.

Let's get started with my card and some details on what I did. I started my card this week with the idea of using the Nested Star Ornaments. I had a layout in mind that I wanted to use as well so I just needed my card colors and patterned paper.
Vanilla card base: 4 1/4" x 5 1/2"
Cherry layering piece: 4 1/8" x 5 3/8"
Patterned Paper: 4" x 5 1/4"
Vanilla Sentiment Panel: 2 3/4" x 3 3/4"
Olive green layering panel: 2/ 7/8" x 3 7/8"

I searched through my Christmas patterned paper for a fun pattern to show off my whimsical star image. I thought dots and stripes would work together well. I was on a definite roll to get my card completed. Dots on the patterned paper and stripes in the way of ribbon for the bottom rectangle piece on the sketch.

My sentiment is computer generated using Word to set it up and then print on vanilla cardstock. After I printed it I used the CottageCutz Rectangle dies to cut it to the size I wanted for my card. I used the 2nd largest die on this one.
I decided to die cut my star in the cherry cardstock for some contrast on my card. I used the Peach Keen 1 1/8" Face Set and stamped in Memento tuxedo black ink. I think these are just the cutest face stamps.
From here I assembled my card. I added some stars to the sentiment panel and also to the striped ribbon panel. The stars are from the CottageCutz Merry Christmas Ribbon die. Used a wink of stella clear pen for a little sparkle.
 
Well that's it for me for this week. I hope I gave you some additional inspiration for Christmas. Also don't forget about our newest challenge going on right now. The theme is fall. Here is the link for more info.
 
So until next week........inky hugs.
 
http://www.scrappingcottage.com/cottagecutznestedornamentsstarbasics.aspx
http://www.scrappingcottage.com/cottagecutzrectanglesetbasics.aspx
http://www.scrappingcottage.com/cottagecutzmerrychristmasribbonelites.aspx


Thursday, September 15, 2016

Shine wreath with greetings

Hi, Vladka here!

I have another CAS Christmas card for you. So, let's take closer look to how I created it.


Basics:

White cardstock for the card base: 5 x  inches (cut 5 x 10 inches, fold in half)
Additional piece of white and kraft cardstock and some white and red cardstock for die cuts

Other Supplies:

CottageCutz Dies: Listed Below
Distress Ink:  Aged Mahogany, Peeled Paint, Forest Moss
Other: perfect Pearls, Scissors, Paper trimmer, Sizzix machine, Scor-buddy, Water, spray bottle, red paint

1. First use the biggest Cross-Stitched Square die and cut the square out of white and kraft cardstock. In spray bottle, mixed also water with Perfect Pearls. Spray it on both squares (and also on card base). This will give some shine to the finished card.


2. Cut the Holiday Wreath out of white cardstock and color it with green distress ink. After that spray some previous prepared mixture on it and let it dry:


3. Apply some red paint on berries and give it a side to let it dry.


4. Cut also greeting out of red cardstock. Distress the edges with Aged Mahogany distress ink and also spray it with mixture of perfect pearls and water. Let it dry.


Now put all pieces together as shown on my finished card. Quick and easy :) It is hard to see all the shine here on the photo but in real live is beautiful.


I hope you like it. Have fun creating. And don't forget, sixth CottageCutz challenge is waiting for you. This time theme is HOLIDAY. You can linked your project here. And please, use only Scrapping Cottage dies.

Saturday, August 20, 2016

TRI FOLD CHRISTMAS CARD

Hello everyone !!!

How are you all doing ?? Are you having fun with all the gorgeous Christmas inspiration?? It's indeed so exciting that the Great day is just 3 and 1/2 months away but the air is filled with spirit of joy. Card making is in full swing everywhere and new designs are making a show everyday. On this ocassion, CottageCutz has come up with amazing Christmas theme dies and many more are still on the way. The new one released just a few days ago are the cutest and most beautiful ones.

Today I'm sharing a Tri fold long Christmas card with you and the twist is that , it is made of envelopes. Yes!!! We can effectively use envelopes to create card bases. This saves a lot of time especially when we have to make a lot of cards.
I am sharing here the pictures as to how I have prepared my card base. The close ups of the various parts of the card will explain you , how I have built up my card.

Here is my card.


  The finished card measures 8.75inches x 4.5 inches.
 You need  three long envelopes 8.75 inches x 4.5 inches that open side ways on the elongated side.
Place the envelopes side by side like this with two envelopes on either side flap side up.


Join the envelopes together. Adhere the flap of the envelope on the left side with envelope in the middle and repeat with the other side.

Cut out pattern papers a little smaller than the envelope to cover the card front, inside and back. Here I have used pattern papers and  stamp from Heartfelt Creations .


Add ribbon and now adhere the pattern paper.


Decorate the card with CottageCutz dies. Add an embossed pattern paper and cover with CottageCutz Wide rectangle stitched frame. Cut die cuts from Holiday bell and layer upon a scrap of paper. Add glitter. Adhere to the card. Add die cut  from the Merry Christmas ribbon.


On the first panel add die cuts from CottageCutz Garden stamp and Winter Cabin Border.


Add die cut from CottageCutz leafy swirls and Best Wishes die cut.


 The finished inside panel


Dies used are listed below.


A fabulous challenge# 5 is going on at the blog and we would be really happy to see your entries.