Showing posts with label Cardinals and Birdhouse. Show all posts

Thursday, September 08, 2016

CottageCutz Challenge #6 - HOLIDAY

Hi, Vladka is here!

Thank you very much for all 33 great cards and projects you've made for Challenge #5. Two lucky winners will be announced at the end of this post. So, stay tuned.


And here is time to start new challenge. 
This time theme is HOLIDAY

So, create a card or on any other gift for a Holiday, such as Thanksgiving or Christmas... 

We all love to create holiday cards, don't we? So, grab your favorite Christmas or Thanksgiving dies and create something. But please, use ONLY CottageCutz dies and not any other dies. "Add your link" button is available under the list of used dies. If you are not familiar with this button, please check this post for more explanation.  Challenge will be closed on 30st of September!


So, before I announced the winers, I'm going to show you my project for today. Here is my card:


Basics:

White card base: 5 1/2 x 5 1/2 inches (cut 5 1/2 x 11 inches, fold in half)
Additional piece of white cardstock and some white and red cardstock to cut out the die cuts

Other Supplies:

CottageCutz Dies: Listed Below
Distress Ink: Tumbled Glass, Fired brick, Aged Mahogany, Gathered Twigs, Ground Espresso
Other: Scissors, Paper trimmer, Sizzix machine, Scor-buddy, White watercolor in tube, paint brush

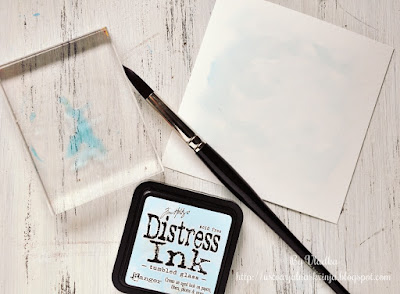
1. Apply some Tumbled glass distress ink on the acrylic block and add also some water. Mixed with the paint brush. Use large paint brush and apply color on the additional piece of paper. Let it dry or use heat gun to speed the process.


2. Mix small amount of white watercolor or acrylic paint with water and flick some droplets of the mixture on the previous colored surface. Let it dry.


3. Cut two Cardinals out of red cardstock and distress the edges with Aged mahogany distress ink. Now cut two more cardinals out of white cardstock and color the beaks and surface around it. Glue these on the top of the red Cardinals. Color also the branch and the Birdhouse with red and brown distress inks. Apply some white paint also on the branches and Birdhouse.


5. With Happy Holidays Notecard die, cut also the expression out of red cardstock. Use scissors to cut of just Happy Holidays part. Glue everything together as shown on the photo. Card is now finished.


-------------------------------------------------------------

And now go back to our challenge a little bit more. As I told you before, two lucky winners will be randomly chosen and will get gift certificate for Scrapping Cottage store.

First one will get gift certificate value of 50$...

... and second one in the value of 25$.

You have time till 30st of September to participate. 
Both winners will be announced in the same post as new challenge (for October) will begin.

All you need to do is take your CottageCutz dies and start creating! 
Please, use only CottageCutz dies!
Have fun and don´t forget to show us all your projects.

"Add your link" button is available under the list of used dies.

-------------------------------------------------------------

And of course we should not forget about the winners for the fifth challenge.

1st Gift certificate value of 50$ goes to Ana S Her card was linked under number 9:


2nd Gift Certificate value of 25$ goes to Mojca. Her card was linked under number 14:


Congratulations!

Please, contact Joanne at scrappingcottage@cox.net to claim your Gift Certificate.

This is it for today. All I want to show you before I left is the list of CottageCutz dies which I used on my project. Here they are:

Monday, August 29, 2016

Cardinals and birdhouse

Hi, Janja here!

Snow covered grass and bare trees do not offer much comfort to the birds, which are looking for food in our garden in the cold days. Birds will thank us if we hung on a tree a birdhouse with seeds in late autumn.


For the card we need:
- white card base: 5.3 x 5.3" (13,5 x 13,5 cm), folded
- kraft cardstock : 5 x 5" (12,7 x 12,7 cm)
- patterned paper: 4 x 4" (10,2 x 10,2 cm)
- white cardstock: 4.5 x 4.5" (11,5 x 11,5 cm)
- white and brown cardstock
- stencil-snow
- white texture paste
- snow marker
- painting knife
- Distress ink: Festive Berries, Aged Mahogany, Black Soot, Tumbled Glass, Broken China
- Distress marker: Mustard Seed, Spiced Marmalade, Black Soot

With two largest dies from basic sets: circle and stitched circle, cut opening in white and kraft cardstock. I like the color of craft cardstock and how it gives a homely feel to the card.
Cut the cardinals and birdhouse from white cardstock with the die cardinals & birdhouse and shadow them with Distress inks.


On kraft cardstock place a stencil and apply a white texture paste over it.


While the snow is drying, cut a bow and tape. For a tape use the die stitched wide rectangle frame. Shadow and attach them to the snow-covered cardstock.


Cut out branches and fence from brown cardstock with the dies: winter branches and garden accessories.
Apply snow with a snow marker.


Assemble the card.


I would like to remind you on our challenge #5 - birthday card. You still have time to share your projects with us. 

That's all for today. Thank you for stopping by. 


Wednesday, August 24, 2016

Christmas Cardinals + Background Technique


Hello Scrapping Cottage friends! Thanks for taking the time to stop and visit today. It's Mary Marsh here bringing you the Wednesday edition of the Blog.

The Design Team has been bringing you some fabulous samples with the new CottageCutz Christmas 2016 dies.  I hope you are being inspired to start thinking about your Christmas cards. I love Christmas time and all the festivities that go with it.

And, I love making Christmas cards. I usually send out around 60 handmade cards each year. I am always on the lookout for cards that can be mass produced. That is where I am taking you today. I am showing a card that would be easy to make a lot of for card giving.

So let's get started with the details on my project.  I am also showing a technique that I tried for the first time and just love the outcome. It's a resist technique requiring just a few simple steps to create a shimmery background. I thought it would be perfect as a backdrop for the Christmas cardinals. It reminded me of a snow squall. I found this tutorial on Splitcoaststampers. Basically here is what I did.

Turquoise Card Base: 5 1/2" x 4 1/4"
Background Panel: 5 1/8" x 3 7/8"

Technique: Faux Mother of Pearl
1.  You need some metallic white paint. I used DecoArt white pearl dazzling metallic.  You use cling wrap and crumple it to use as the applicator for the paint. You will need to use either a craft mat or paper to protect your work surface. This technique gets a little messy. 
2.   I squeezed a small amount of the paint on my craft sheet. Dip the plastic wrap into the paint and pounce it on the craft sheet a few times to work it into the cling wrap and also to remove excess paint. Then you tap it lightly onto your cardstock. Repeat this step until you have your cardstock covered. I left some open area on my cardstock because I wanted the look of snow.
3.  Once you have applied the paint where you want it, set your cardstock aside to dry.
4.  Now it's time to start adding your ink. You can use a sponge, blending tool or even a brayer. I used a sponge on my cardstock. The ink color is turquoise.
5.  I applied the ink all over my cardstock. As you are applying ink your metallic design will start showing through.  The paint will resist the dye ink. Once you have the look you want, take a paper towel and buff the cardstock to remove the ink that is laying on top of the acrylic paint. Then you will see more of the metallic paint design. This creates your faux Mother of Pearl design.
I created several of these backgrounds and it was tough getting a good picture. This background  I didn't use on my finished card but it was the one that cooperated with my camera.
6.  Now that the background is prepared, I decorated it with the Cardinals and Birdhouse dies.  The Merry Christmas sentiment is from the Christmas Santa die set. I used multi-matte adhesive, and dimensional adhesive to attach the die cuts.
 
Well, that's it for me for another week. I hope you have been inspired to give this technique a try even if you aren't making your Christmas cards yet. And. don't forget our birthday challenge is still running until 8-31-16. Get details here.
 
Until next time........inky hugs!


http://www.scrappingcottage.com/cottagecutzmerrychristmassanta.aspx
http://www.scrappingcottage.com/cottagecutzcardinalsandbirdhouse.aspx