Saturday, March 31, 2018

Stitched Flowers for Mom

Hello Scrapping Cottage friends! Thanks for taking the time to stop and visit with us today. It's Mary Marsh here bringing you the Saturday edition of the Blog. Before I start with today's card, I wanted to give you a heads up on a flash sale going on over in the online store. You can save up to 50% on selected dies. Hurry though the sale ends Sunday, April 1 at 9:00 pm.

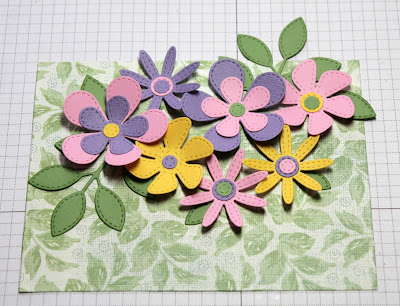
Today, I am showing a card that is featuring dies from the Stitched collection and the good news is they are on sale for 25% off until tomorrow night. I used the Stitched Flowers and Stitched Alphabet dies to create a card for Mom. Mother's Day is coming soon. So lets get started with the details on how I created this project.

Step 1: Since this is a floral card for Mom, I wanted the flowers to be in bright Spring colors. So I used yellow, pink and purple for my flowers and a wasabi green for my stems.
Once the stitched flowers and leaves were cut, I arranged them on my patterned paper. The paper is from a collection that matches the wasabi green cardstock.  I wanted the flowers curved a bit for depth so I used a bone folder to curl up the edges. I attached flowers with dimensional adhesive.
Patterned Paper Panel: 5 3/8" x 4 1/8"
Step 2: Cut my Mom Phrase from the Stitched Alphabet die with purple cardstock.

I tried placing the letters across the bouquet but the colors just blended in too much with the flowers. And, because I curled the flowers I could see I was going to have difficulty attaching it here. The next option was to place it at the bottom of the patterned paper. I like the look of it placed there.
Step 3: To complete my card I attached the image panel to a wasabi cardstock base. It is a match for the patterned paper and I thought it looked better than using vanilla.
Wasabi Card Base: 5 1/2" x 4 1/4"
Well, that's it for me for this week. I hope you have a blessed Easter celebration. I am having my family for dinner. See you next Saturday!

Dies used to create card:
http://www.scrappingcottage.com/cottagecutzstitchedalphabet.aspx

http://www.scrappingcottage.com/cottagecutzstitchedflowers.aspx


Friday, March 30, 2018

Smile - It's Spring!

Good morning Cottage Cutz fans!  It's Jeanne today with a card today that I hope brings a smile to your face.  Before I start my card, I want to let you know that there is an Easter sale going on right now in the online store. You can get savings up to 50% on selected dies. Hurry though the sale ends Sunday, April 1 @9:00 pm.

Now on to the card! I chose the colors using this week's color challenge at Splitcoast Stampers and I will be posting it in that challenge.

My first step was to cut my pieces.  I used the Stitched Flowers die and cut one set of Daffodil Delight, two sets of Old Olive and two sets of Pink Pirouette.  I also use the Stitched Honey Bees to make a bee and cut the Smile Phrase in Old Olive.  I wasn't certain how many flowers I would need, but I knew I had plenty now!

Next, I started with an A2 top fold card base in white and adhered a piece of striped paper cut to 5 1/2 x 2 3/4 inches along the bottom.  Next I cut a piece of white cardstock 5 1/2 x 4 1/4 inches.  From this I cut an angled panel.
I measured 1 3/4" up from the bottom and 5" from the left side and marked each with a pencil.  Using my paper trimmer I cut between the pencil marks.
Then I marked 2 1/8" to the left of my bottom mark and 2 1/4" up the right side of the panel.  Again I used my paper trimmer to cut between the marks.  I erased any leftover pencil.
The result is an angled panel that I adhered over the striped panel on the front.  (And to be honest, any angle would do - you just don't want the panel to be straight.  This way the flowers make a nice curve on the card.)
I assembled the flowers and the bee.  I made seven, but after laying out everything on the card I decided to use only three.  Now I have leftovers for another card!
I placed the foliage on either side of the panel's point and used a foam dot to pop up the main flower and glued the other flowers directly to the card front on either side.  I placed a few of the individual leaves among the flowers.
Finally, I added some shimmer pen to the bee's wings.  I thought the card could use just a little bit of sparkle!

Dies used:
http://www.scrappingcottage.com/cottagecutzstitchedflowers.aspx

http://www.scrappingcottage.com/cottagecutzstitchedhoneybees.aspx
http://www.scrappingcottage.com/cottagecutzexpressionsplussmilephrase.aspx

Don't forget to visit the online store for the Easter sale. You can get savings up to 50% on selected dies. Hurry though the sale ends Sunday, April 1 @9:00 pm.

Thanks for stopping by - I hope you have a great weekend and a Happy Easter!

Thursday, March 29, 2018

Homemade Goodies!

Good Morning to Our Scrapping Cottage Fans!

It is Pam sharing with you today from Stamper at Heart Blog Spot.
Before I get started I wanted to give you a heads up about the sales we are have at our store.  We have a Collection of new release dies called Rise and Shine that are currently 25% off and they are just so much fun!  To see some card samples from the design team click here,  here and here!

Now onto the card for today! I had a stash of country looking paper so I used that as my inspiration for today's card!  Plus I have a friend from church who makes delicious jams and butters.  I was lucky enought to get one of each.  So I thought this would make a cute thank you card.

 1.  Using the Stitched Jar and Stitched Fruit die cut out the different elements.  I cut the jars out of vellum and silver paper for the lids.  The fruit is cut out of different colors of card stock
 2.  Use copics to give the jars a little shading
 3.  Glue the labels and lids to the jars
 4.  Using the labels as a base glue down the different fruits inside the jars on the back of the jars
 5.  Use a vanilla A2 card base and cut a piece of 4 x 5 1/4 piece of yellow card stock and a 3 3/4 x 5 piece of DP from the Studio Calico South of Market Collection.  Also cut a 5 x 1 1/2 strip of DP newsprint.
 6.  Glue all the pieces together and pop dot the jars to the card front
 7.  Cut out 3 Thanks and glue together and then add glossy accent to the top
8.  Cut out a small rectangle using the Double Stitched Rectangle die.  Glue to the front and then glue down the word Thanks

Cottage Cutz Products


Thanks so much for stopping by and please make sure you don't miss out on the Easter sale going on in our online store! You can save up to 50% on selected CottageCutz designs.
Blessings
Pam

Wednesday, March 28, 2018

CAS - Rise & Shine Hello!


Hello crafty friends! It’s Janet here to share with you a CAS (Clean & Simple) card featuring dies from the new Rise & Shine Collection and the Spring Collection. Before I forget, did you know that the Rise & Shine Collection is on sale for 25% off? Here’s the link to check out all the great breakfast and food related dies in this release: Rise & Shine Collection

So back to my card. When I first saw the Rise & Shine Collection, I was immediately attracted to the strong and colorful graphic in the Rise & Shine Phrase die. It’s big, it’s bold and it’s such a beautiful classic graphic image. I have used it today to make a hello card that will tell someone special I’m thinking about them. Since it has a farm theme, I kept the colors simple: green, craft, white, blue, red, with highlights of yellow and orange. I found that the Oval Doily and Frame die was a perfect backdrop to the die. Inside, I used the craft doily portion as the mat for the wonderful one cut Butterfly Hello die.


Today’s video is a short tutorial to show you how this card is made. I hope you’ll visit and let me know what you think. Just click on the thumbnail below or on this direct link to watch: Video Link 


Thanks for checking out today’s project. It’s always fun to be here with you.

Dies used in this project:


Tuesday, March 27, 2018

Rise & Shine Card Samples - Part 3

Hello Scrapping Cottage friends! Thanks for taking the time to stop and visit today. The new Rise & Shine dies are available in the online store and the dies are currently on sale for a limited time at 25% off the retail price.

So many cute breakfast and made with love themed dies. The design team has put together some great samples to give you some ideas on how to use these dies. We showed some samples previously- click here and here to see those.

So let's get started with the samples for today.

Card 1: This first sample is a card from Anja Zurga and she used the coffee pot & toaster dies. She created a cute card that would be a perfect way to thank someone for their hospitality or a random act of kindness. My neighbor has sent over some delicious breakfast foods on the weekends. This would make a wonderful way to say thanks.
Card 2: This is another card from Anja. On this sample she used the Homemade Bread dies. How cute would this be tucked in with a homemade treat that you are giving to someone. A handmade card is always appreciated by the recipient.
Card 3: This next sample is a card from Janja Albrecht. She used the Bowl of Cereal die to create this lovely card. I think this would make a great card to let someone know you are thinking of them or even a get well card. I like to have cards on hand to send out for no particular reason and this would be such a nice one.
Card 4: This next sample is from Janet Axtman. She used the uber cute Breakfast Plate and Coffee & Donuts dies. Her card is such a wonderful way to let someone know you want to get together with them.
Card 5: This next sample is from me -Mary Marsh. I used the Coffee & Donuts dies to create a card to let that special someone know you love them. It could be used for an anniversary or birthday or even at Valentines day by changing up the patterned paper.
Card 6:  This next sample is also from me -Mary Marsh. I used the Breakfast Plate die to create another card to let that special someone know you love them. This one could also be used for an anniversary, birthday or Valentine's Day.

That's our card samples for today.  Hope these samples have sparked some ideas in ways you could use these dies. They are so versatile and could be used for a variety of occasions. And, remember they are currently 25% off for a limited time in the online store.

Dies used to create cards:
http://www.scrappingcottage.com/cottagecutzbreakfastplate.aspx
http://www.scrappingcottage.com/cottagecutzcoffeepotandtoaster.aspx
 
http://www.scrappingcottage.com/cottagecutzcoffeeanddonuts.aspx

http://www.scrappingcottage.com/cottagecutzbowlofcereal.aspx

http://www.scrappingcottage.com/cottagecutzhomemadebread.aspx