Wednesday, January 31, 2018

Spring Happy Mail!


Hi everyone and hope you're having a great week so far! It's Janet here with an extra video post to show off the Happy Mail I received from the Scrapping Cottage this week. It's the dies I ordered from the Spring and In Stitches releases that just arrived and I am super excited to share them with you!

Now, I'm always a fan of all things CottageCutz but I have to say that this release is even more wonderful than normal. The Easter and Spring themes in the release are so cute and fun! CottageCutz does animals better than anyone and you'll not be disappointed in the little critters in this release! The bunnies and chicks are adorable! There are also butterflies, eggs, flowers and scenes that will seriously get your creativity flowing. Just a few of these darlings are shown in the picture below.

The In Stitches collection included in this release are 12 images outlined and accented with stitches. You'll find fruit, flowers, bees, an owl and bird, sewing notions, mushrooms, a new sun, cloud and umbrella set, canning jars and best of all, a set of letters and numbers!
Please make sure you click on the cute animated owl at the top of the blog to visit the store. These dies are are available now and are currently 25% off. Get them while you can because I suspect some of these will sell out.

Click on the video link below to see the dies I picked up. I hope you enjoy it.


Thanks for spending a few minutes here today. I'll be back on Valentine's Day with a new video tutorial.

Tuesday, January 30, 2018

Get To Know Jeanne Knobbe

Hello Scrapping Cottage friends! Thanks for taking the time to stop and visit with us. We started a new feature several weeks ago that we are continuing with today on the Blog.  We would like to give you a closer look at our designers.  It's  a "get to know the design team"  and today we are featuring Jeanne Knobbe.
 
I’m Jeanne Knobbe and I have been drawing, coloring and creating ever since I can remember. I grew up in Los Angeles and graduated from UCLA with a degree in fine arts. I then moved to Oklahoma where I turned to graphic design and spent over 20 years creating with a computer.
I gave that up six years ago to move back to southern California and help my husband run his business.  My days are still spent in front of a computer but now it’s accounting programs and spreadsheets not Photoshop!

Paper crafting has become my creative outlet and I particularly love cardmaking.  I would say my style is clean and simple, but I also love mixed media.  Sometimes I feel I have multiple art personalities – at times I know exactly what I’ll create and at other times another style decides to show up instead!   Art for me is a journey and I enjoy seeing where it takes me. I find I love getting my hands messy as opposed to making art on a computer - it is much more gratifying.

I live near San Diego with my husband of 33 years, our two daughters, two cats and feisty Shorkie.  I’m very appreciative that they are all understanding of the mess I can make while creating and the delayed dinners that can occur when I’m “in the creative zone.” 


When not accounting, card making or working on my blog, I love to attend concerts, play Mah-Jongg and watch hockey.
Here are a few of my favorite projects made with CottageCutz dies.


Monday, January 29, 2018

Bee Yourself

Hi, Lois here with some exciting news today.  CottageCutz has a brand-new release of two series of dies -- In Stitches and Spring Designs -- for a total of 33 new dies.  PLUS, for a limited time both sets of dies are 25% off.  I'm using two dies from the In Stitches series (Stitched Alphabet and Stitched Honey Bees) for my card today.  I so enjoyed the card I made a couple of weeks ago using the Eclipse technique, I "sort-of" used it again today.


For the card base, the following pieces of cardstock are needed:

Black heavy cardstock - 5 1/2" x 8 1/2", scored at 4 1/4"
White cardstock - 4" x 5 1/4"
Honeycomb patterned paper - 4" x 5 1/4"


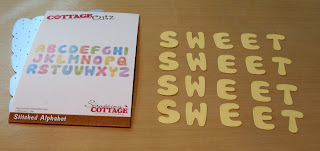
Because all the letters of the Stitched Alphabet are on one die, I cut four sets of letters from yellow cardstock.  I had to cut four additional E's from scraps of cardstock.  I'll put the remaining, unused letters into a bag for future use.


I ran the letters through my Xyron sticker maker.


I then cut the images from the Stitched Honey Bees die . . . 


. . . and colored them with ink and markers, assembling the pieces to create my hive, bees, and honey pot.


After stacking the letters, I sponged them with a bit of Wild Honey ink and created the front of my card.  I did not use all the die-cut images on the front.


The remaining images I glued to the inside of the card and stamped an appropriate sentiment.


CottageCutz dies used on this card are:

http://www.scrappingcottage.com/cottagecutzstitchedalphabet.aspx


http://www.scrappingcottage.com/cottagecutzstitchedhoneybees.aspx


Sunday, January 28, 2018

Sending Hugs

Hi!

This is Anja again. Yesterday Mary showed you some new dies that are already in the store. They are super cute. I'm still waiting for mine to come, so I used a cute bear die today and some Distress Oxides to make a simple card.


I used:
- Cottage Cutz dies (Sending Hugs Bear, Oval Set (Basics),
- Distress Oxides (Worn Lipstick, Candied Apple, Abandoned Coral, Fired Brick) and Inks (Forest Moss, Fired Brick),
- white card base 10,5x15 cm),
- white water color paper for background (10x14,5 cm) and die cuts,
- Zig brush pens (grey and flesh shades),
- black pen,
- heat gun,
- watercolor brush,
- silicone pad,
- paper glue.

First I made the background. I started with lighter shades and then got to darker ones. It shows on the pictures in which order I added the colors.


When I was satisfied with the colors, I spritzed water over it and dried the paper with the heat gun.


Then I used oval die (the second in size) and embossed it on the paper wit my silicon pad and Big Shot machine.


This time I used Zig markers to color the die cuts. I wanted the bear to have a more water colored look.


When I had everything colored I glued it together. And this is the finished card.


Have a nice Sunday and don't forget to check all the new dies in the store. You can get them on discount. Easter will be here soon.

See you next Sunday.
Anja Z.

Cottage Cutz products I used:


Saturday, January 27, 2018

Spring Hot Air Balloon Hello (new die release)

Hello Scrapping Cottage friends! Thanks for taking the time to stop and visit today. It's Mary Marsh here bringing you the Saturday edition of the Blog. Hope you are staying warm during this cold snap that is currently with us.

Here is some good news that comes in the middle of winter! We have a new release of dies. There is a In-Stitches release with 12 new dies and a Spring release with 21 new designs. And, some other good news is that for a limited time, you can get the new dies at 25% off.

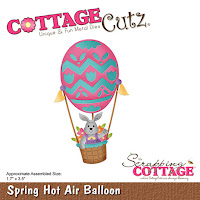
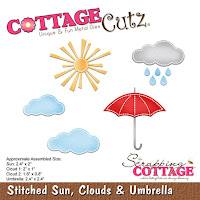
Today, I am using the Spring Hot Air Balloon die and the Stitched Sun, Clouds and Umbrella die. I thought I would create a thinking of you type card today. So let's get started with some details on how I created my card.

Step 1: With the hot air balloon die, I knew I would be creating a sky scene with some clouds and the balloon floating. I found this pattern paper in my stash from a serene scenery collection that worked well for this card.
I used a kraft cardstock as the layering panel for the patterned paper and a cardstock called island indigo for the card base.
Card Base: 4 1/4" x 5 1/2"
Kraft panel: 4 1/8" x 5 3/8"
Patterned Paper: 3 7/8" x 5 1/8"
Step 2: I cut the hot air balloon and the stitched clouds. When I cut my dies, I used different color cardstock as opposed to coloring each piece. I like how colorful the balloon turned out.
For the balloon:
kraft for the balloon basket
berry burst for the balloon
lemon-lime for the chevron and other shapes - I did an inlay technique here
light gray for bunny
pink for her outfit
Step 3: Now that the dies are cut and assembled, I started the card assembly. I adhered the base and panels with double sided tape. I did that before I stamped my sentiment. It's not how I usually like to do it but my ideas were running ahead of me this week (lol)!!
Used the stamp-a-ma-jig to get the right placement for the sentiment. I stamped with black ink since it was going right on the patterned paper.
With the stamp-a-ma-jig you first use the purple positioner and place against the plastic stamping card. You stamp your sentiment using the purple positioner as your guide. Then you take the plastic and place it over your cardstock in the area where you want to stamp. Once its straight you remove the plastic.
You again use the purple positioner as the guide for your stamping block and stamp the sentiment.

This photo is showing the plastic piece placed over the paper and the purple positioner holding it in place.
The balloon and one of the clouds was adhered with dimensional adhesive.
I felt like the card still needed something else so I scattered a few sequins. They seem to be my go to embellishment these days. I think they were a good finishing fit for my card.
Well that's it for me for this week. I hope I have given you an idea on a way to use this new die. The Design Team will have lots of samples to show over the next weeks. Lots of cute and fun ideas for Easter or Spring cards.
And remember, these days are currently 25% off the regular price for a limited time.

Dies I used to create card:
http://www.scrappingcottage.com/cottagecutzspringhotairballoon.aspx
 
http://www.scrappingcottage.com/cottagecutzstitchedsuncloudsandumbrella.aspx


Friday, January 26, 2018

Celebration!!!

Good morning!  It's Jeanne today with a birthday card.  I don't know about you, but I can never have too many birthday cards on hand.  And if they are good for either male or female, young or old that's even better.  This card is great for anyone.
I found some patterned paper that reminded me of birthday candles and got my colors from that - Bermuda Bay, Calypso Coral, Daffodil Delight and Night of Navy.  I wanted some fun bright colors.  Then, I used the Layered Cake & Stand die and cut it out of all colors so I could see what combinations I liked for the cake. (And now I have extras for other cards in complementary colors!)
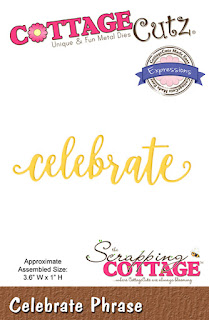
I also die cut the cake stand from silver cardstock and the word "Celebrate"from the navy.  I cut an A2 card base out of white, a strip 1 x 5 1/2 inches from the pattern paper and a strip 1 1/8 x 5 1/2 inches from the navy.  I also die cut two rectangles using the second largest die from the Nested Wacky Stitched rectangles - one white and one Bermuda Bay.
I then stamped confetti on the white die cut rectangle.

I used snail adhesive to attached the pattern paper over my navy strip and then glued it to the left side of the card.  I angled the Bermuda Bay panel on the card and glued the white panel on it but just a little offset to give a "shadow".
My final step was to add the cake, the sentiment and some sequins.

Dies used:
http://www.scrappingcottage.com/cottagecutzlayeredcakeandstand3x3.aspx
http://www.scrappingcottage.com/cottagecutznestedwackystitchedrectangleset.aspx
http://www.scrappingcottage.com/cottagecutzexpressionspluscelebratephrase.aspx

I hope you enjoyed my card today.  Thanks for stopping by and have a creative weekend!